contact

Use the form on the right to contact me.

For media enquiries, appearances and general bookings please contact Tess at Essential Lifestyle Group - tess@essentialgr.com  


123 Street Avenue, City Town, 99999

(123) 555-6789

email@address.com


You can set your address, phone number, email and site description in the settings tab.
Link to read me page with more information.

Blog

Andy Bates is known for his hearty street food. His modern twists on classic dishes are fuelled by his international travels and a passion for re-discovering and cooking great British food. As the gaffer of specialist food company ‘Eat My Pies’, Andy brings the best of British food back to the public, including classic tarts, pies, Scotch eggs and, of course, some tasty puddings.

Andy is a contributing chef for Food Network UK and has already had two successful series broadcast on the channel - Andy Bates Street Feasts and Andy Bates American Street Feasts. His latest series, Andy Bates Brazilian Street Feasts, launched in February 2014. All three series follow him as he travels across continents to explore the world of street food and find the stories and people behind the recipes. As a result, he has become a leading expert on street food, with regular appearances on the street food circuit. Andy, who lives by the quote "You should always finish on a little bit of pudding", has also written a cookbook offering modern twists on classic dishes.

Chef TV Blog Recipes 

On a global food adventure meeting inspiring people along the way.

Fennel, Onion & Blue Cheese Tarte Tatin

Andy Bates

From Patisserie Perfection With Eric Lanlard and John Whaite on the 'Big Eat' on Food Network UK...

A great mix of sweet and savoury makes this take on the classic French dish a real winner.

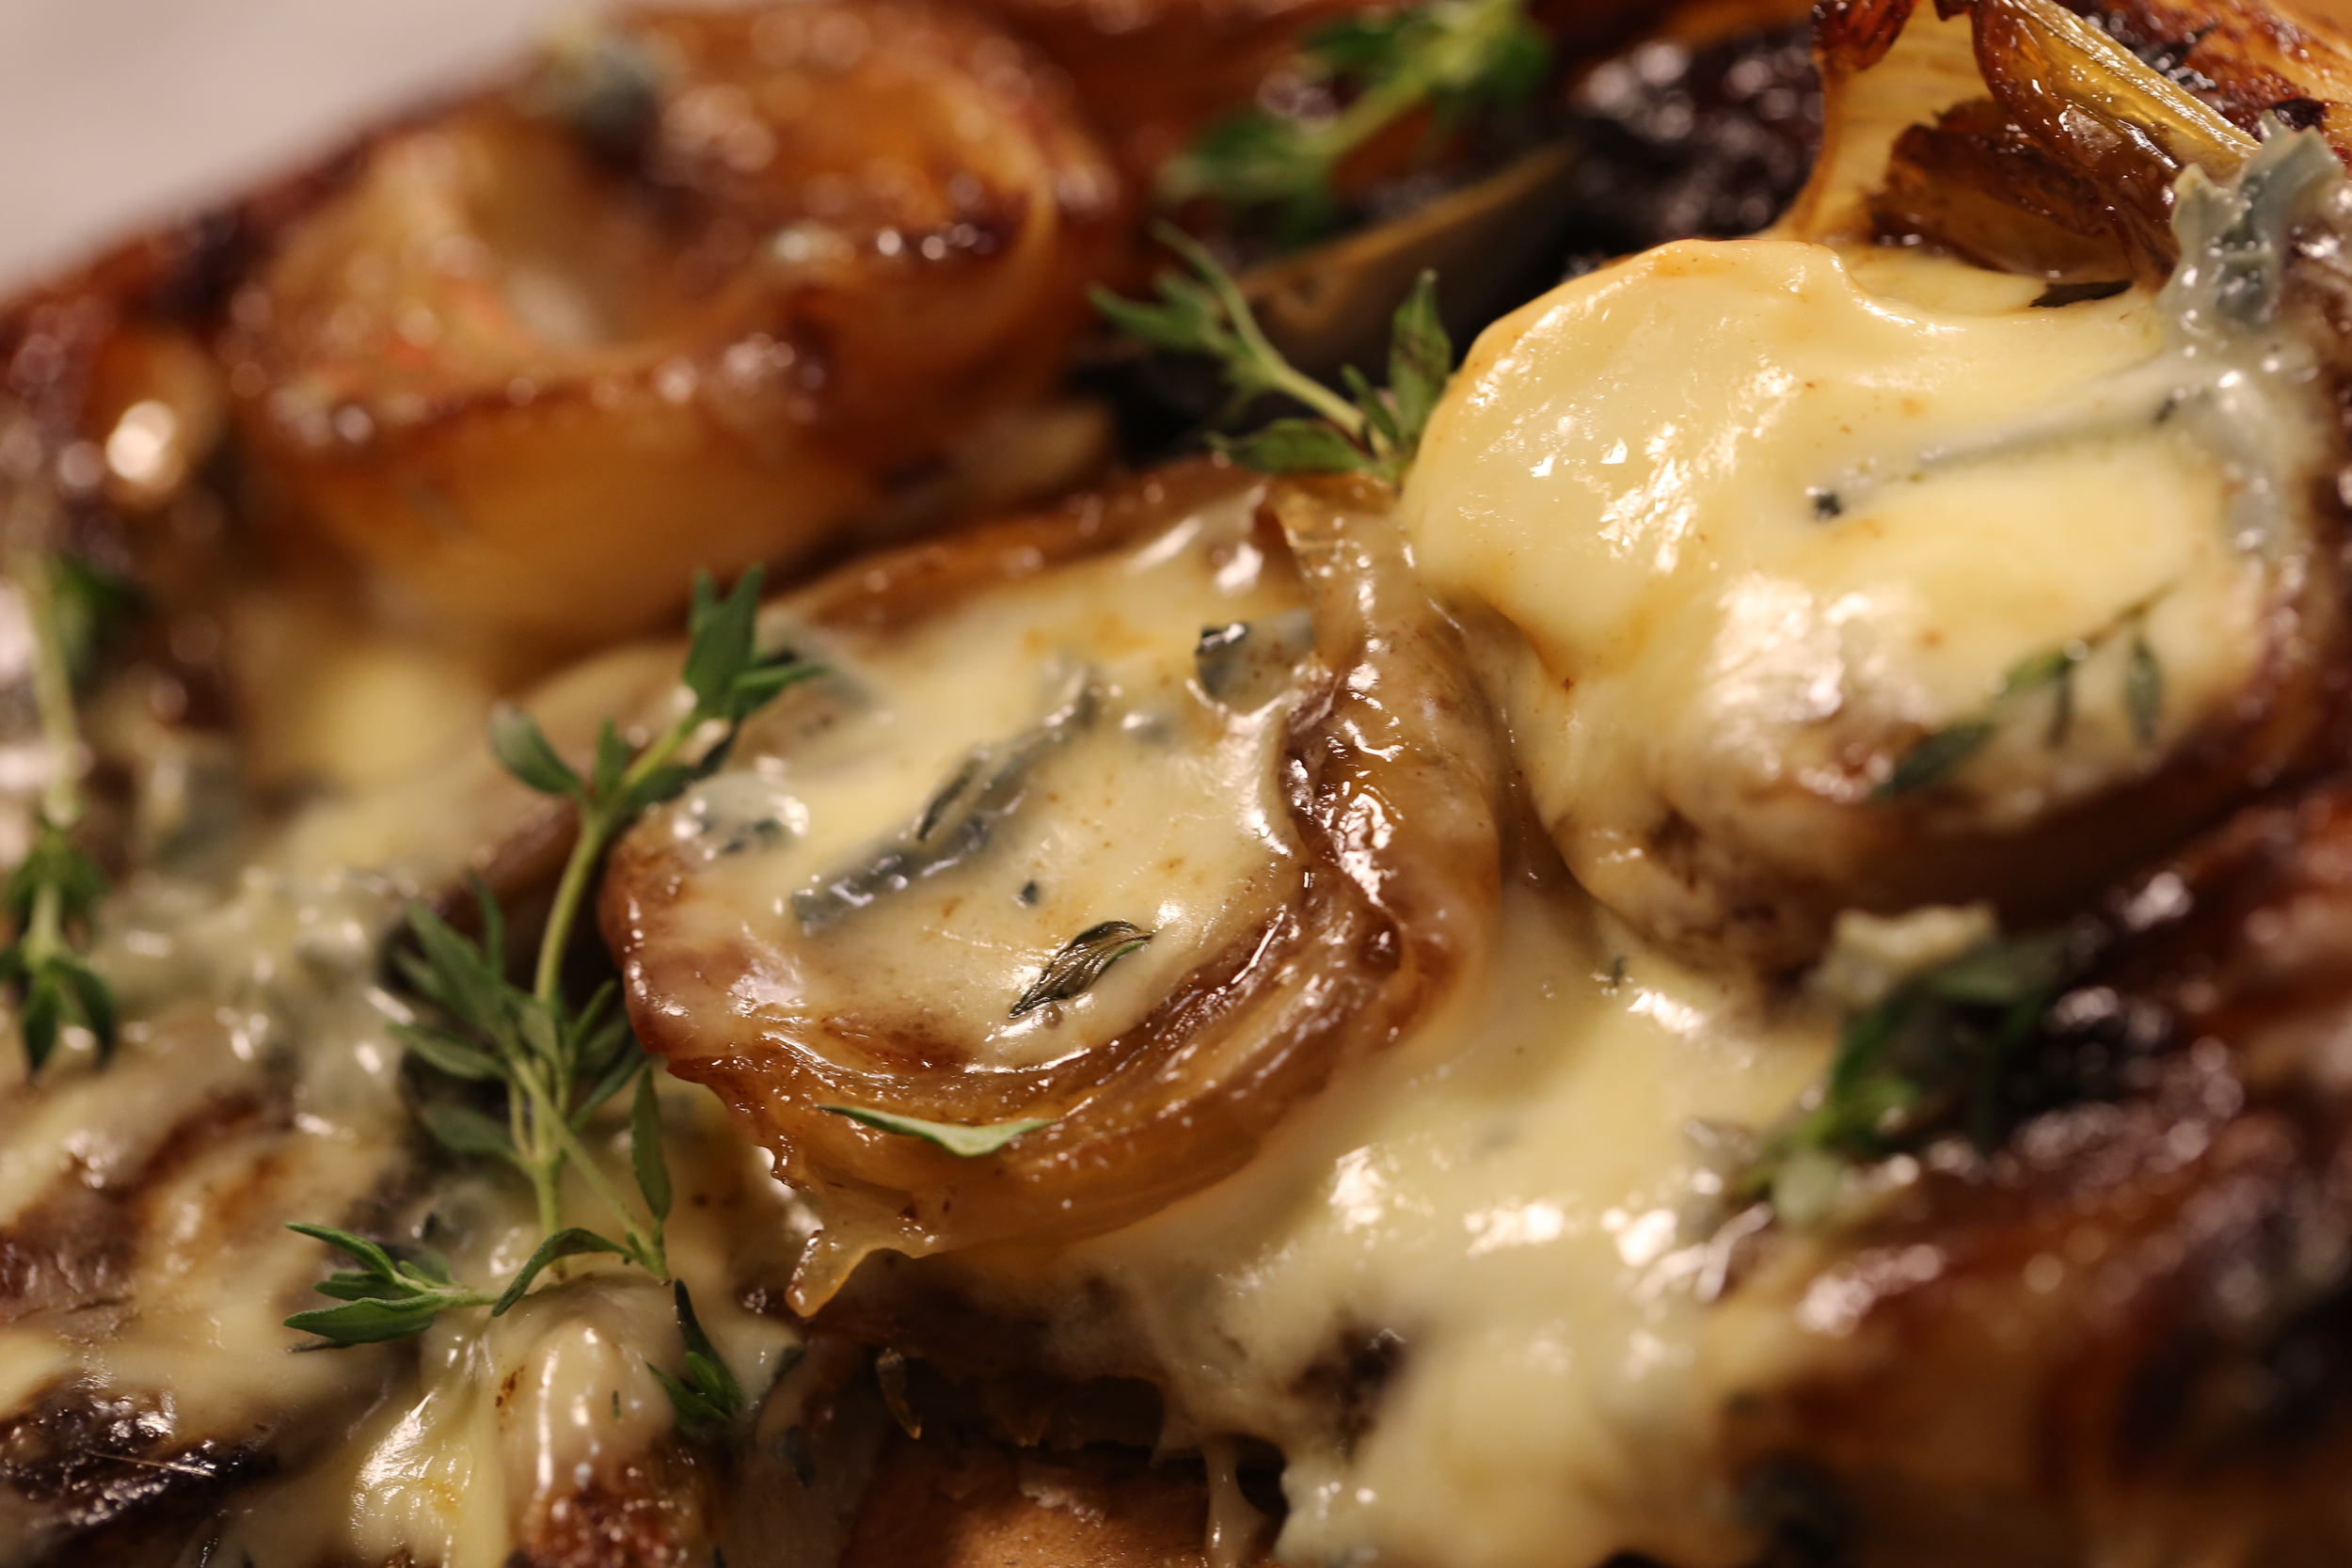
Adding the cheese towards the end stops it melting completely through leaving gooey half melted creamy blue chunks. The pickled walnuts sharpen the dish and the onions and fennel complement each other making this a satisfying side dish or main. 

Easy to make but will impress those your cooking for, pairs perfectly with a glass of port.


My Fennel, Onion & Blue Cheese Tarte Tatin

andy-bates-fennel-onion-blue-cheese-tarte-tatin

Ingredients

  • 200g puff pastry
  • 3 small brown onions, peeled, trimmed and cut in half
  • 2 small fennel, quartered
  • 50g butter
  • Salt and pepper
  • 2 sprigs thyme
  • 50g creamy blue cheese
  • 25g pickled walnuts, quartered
  • 2 tablespoons caster sugar


Method

andy-bates-fennel-onion-blue-cheese-tarte-tatin

Pre-heat the oven to 180°C.

In a heavy based 9-10 inch frying pan with an ovenproof handle make a dry caramel and then add the butter. Add the onions, cut side down, and the fennel, thyme and season. Cook over a medium heat, cook for 10 minutes or until caramelised, then add the thyme and cover with foil and bake for 10 minutes to soften the onions. Allow it to cool.

andy-bates-fennel-onion-blue-cheese-tarte-tatin

Roll the pastry to a circle roughly the same size as the pan.

Drape over the pan and gently tuck in the edges around the onions.

Prick it in a couple of place and bake for 20 minutes, until it’s golden and crispy.

Carefully turn it out onto a plate and scatter with the walnuts and cheese and carefully flip it back into the frying pan and return the pan to the hob for a minute, until the cheese has melted.

Turn it out onto your serving plate, garnish with some thyme and serve.

andy-bates-foodnetworkuk

Salt and Pepper Squid

Andy Bates

From Seaside Specials With Lesley Waters and John Whaite on the 'Big Eat' on Food Network UK...

If you read my tweets or follow my Instagram you'll know my feelings towards this dish... It would be served as starter for my final meal. I cannot get enough of it and served with a cold beer, it's one of the greatest food and drink combos ever!


my salt and pepper squid

andy-bates-salt-and-pepper-squid

Ingredients

For the squid:

  • 500g baby squid, cleaned and with the tentacles reserved
  • 100g cornflour
  • 100g plain flour
  • 2 tablespoons Szechuan peppercorns, lightly crushed
  • ½ teaspoon Chinese 5 spice
  • 1 tablespoon sea salt
  • 10 large garlic cloves
  • Vegetable oil for frying
  • Pepper

For the dipping sauce:

  • 3 tablespoons soy sauce
  • 1 tablespoon fish sauce
  • 1 red chilli, finely chopped
  • 3 tablespoons sweet chilli sauce
  • Fresh coriander and lime wedges to serve

Method

Heat a wok or deep fat fryer to about 160°C.

While the oil is heating up crush the garlic in a pestle and mortar, don’t over pound it as you want to keep it in good bits and not pureed. Once the oil is ready, cook the garlic until caramelised and crispy, they will float to the top of the hot oil once cooked, remove the garlic with a slotted spoon and drain on some kitchen paper.

Set aside in a warm oven while you fry the squid. Open the body of the squid, take a sharp knife and gently score the inside of the flesh of the squid, be careful not to cut all the way through.

Crush the Szechuan peppercorns and 5 spice in a pestle and mortar, you still want a little texture in the pepper so do not pound to a powder. Add the salt and crush lightly again, put it into a ziplock bag with the two flours and shake well.

Put the prepared squid into the bag of seasoned flour and toss quickly as you don’t want the squid to get over coated in the flour.

The lovely Lesley Waters!

The lovely Lesley Waters!

Increase the temperature of the oil to around 185°C. You can check that the oil is up to temperature by dropping a small piece of bread into the oil; this will go golden brown quickly.

Drop the squid into the hot oil, cooking it in 3 or 4 batches, frying to 4 or 5 minutes. As soon as the squid is cooked the bodies will curl up, they will be crispy and a nicely golden brown, remove them with a slotted spoon and drain it on some kitchen paper. Keep warm in the oven while you cook the remaining squid.

Make the sauce by mixing all the ingredients together, mix well and put into a suitable serving bowl. When all the squid is cooked, toss with the caramelised garlic and sprinkle with coriander leaves.

Serve with lime wedges and the dipping sauce.

andy-bates-foodnetworkuk

Ultimate Potato Dauphinoise

Andy Bates

From Culinary Classics with Rosemary Shrager and John Whaite on the 'Big Eat' for Food Network UK...

The first dish I was ever taught to cook in a restaurant at Reads, Kent by my good friend James McLean. You can't rush a dauphinoise and need to make sure every layer is seasoned and placed neatly. It takes time, but when well done... It's totally worth it.  It can be cooked a day in advance, portioned and reheated for your party the next day.


My ultimate potato dauphinoise

andy-bates-ultimate-potato-dauphinoise

Ingredients

  • 1.5kg floury potatoes, such as Maris piper
  • 500ml double cream
  • 3 garlic cloves
  • 1 sprig of fresh rosemary
  • 1 small onion, peeled and halved
  • 150g Gruyere cheese, grated
  • Salt and pepper
  • Oil

Method

Pre-heat the oven to 160°C. Peel the potatoes and place them whole into cold water.

Pour the cream into a pan, and then add the garlic, rosemary and the onion. Heat them to a boiling point and simmer for 5 minutes.

Allow them to cool slightly, then strain into a jug or another pan. Slice the potato directly into the warm, flavoured cream. Lightly cover your dish with a thin layer of oil. Once the potatoes and cream are well mixed, begin to layer the potato into your dish, adding some Gruyere cheese and seasoning between each layer.

Once the dish is full and you’ve used all the cheese. Pour a little cream over the top to help the cooking process.

Bake in a bain marie by placing the dish into a larger dish and filling halfway with hot water, then put it into the oven for 1 – 1 ½ hours. Once cooked, rest it for 10 minutes and then serve it.

andy-bates-foodnetworkuk

Wild Beer Co | Cheddar and Ale Soup

Andy Bates

Craft Beer, Craft Beer, Craft Beer!!!

Beer tasting with Andrew & Brett of Wild Beer Co

Beer tasting with Andrew & Brett of Wild Beer Co

You'd think that beer has only just been invented in recent times with the explosion of craft beers over the past few years on our shores, but our beers and real ales have always been right up there as some of the best produced in the world and let's face it we pretty much invented I.P.A & pale ale so what's all the fuss about?

My first experience of 'craft beer' was over in America in 2012 while travelling the country filming my second series of Street Feasts for Food Network UK. After filming each day, the crew and I would go to a bar and try what I would describe as cold, fizzy and strong I.P.A. I was hooked straight away, refreshing and with lots of flavour and an unfamiliar taste as I was a premium lager drinker (to my shame). So I asked myself what was so different... Do the hotter summers of the States demand a cooler beverage? If so, I can see why the cold and fizzy-ness would work so well over there but here with our colder climate, is there really a need to follow in their steps when our cask ales work so well? Or is it simply just another way to enjoy beer?

Now back to Britain. It seems so, as we now have over 1,200 independent breweries in the UK producing craft beer and not just the American style but with flavours from all over the world and of course, British Ales. Cynics (and there's no shortage of them) will say its an over hyped machine with people jumping on bandwagons but for me I see nothing but success stories of people setting up small businesses, getting out there and giving it a go (exactly what this country needs) and doing something they are passionate about. Now we love an underdog over here so tell me what is there not to like about these companies?

Which leads me onto the Wild Beer CompanyI was lucky enough to be sent down by BBC Food and Drink to spend a day with them at their brewery, finding out what inspires them, how the business is going and of course try a beer or two ;)

Set up in 2012 by Andrew Cooper and Brett Ellis on a mission to "brew beers with a bit of a difference focusing on different ingredients, different yeasts and different barrel ageing techniques."

Both Andrew and Brett have worked in food and drink throughout their careers. Brett from California, a former chef and Andrew (an Englishman) in management and ownership of pubs and bars. They meet working at a brewery and discovered they shared a love for sour and interesting beers. 

Cheddar @ Westcombe Dairy

Cheddar @ Westcombe Dairy

Brett took me foraging around the Somerset countryside, showing me how they use natural yeasts including berries for their beers. This method really sets them apart from mass produced breweries. Back at base, Andrew took me through a tasting session... What really stood out to me was that these are not beers for downing by the pint but drinks to be slowly enjoyed and importantly matched with food. 

Now onto my recipe...  One thing I learned was that the Wild Beer Co are based directly opposite to Westcombe Dairy, producers of some of finest cheddar in Somerset. This was the opportunity for the crew and I to stack up on a car load of cheese and beer. Gleefully taken, it gave me the perfect excuse to make a Cheddar and Ale soup. I used cheddar from the farm shop and Wild Beer's Scarlet Fever, a red ale with toffee caramel and citrus hops. A perfect combination!

So if you have not guessed it by now... on this week's BBC Two - Food & Drink, I'm talking CRAFT BEER with the Wild Beer Co and I join Melissa Cole at Bristol Beer Week. Tune in this Friday at 8:30 or after on catch-up HERE.

Enjoy, it's a great one!

Filming @ Bristol Beer Week w/the wonderful Melissa Cole

Filming @ Bristol Beer Week w/the wonderful Melissa Cole


My Cheddar and Ale Soup

andy-bates-cheddar-and-ale-soup

Ingredients

(serves 4)

  • 50g butter
  • 1 onion (finely chopped)
  • 2 cloves of garlic (crushed)
  • 60g plain flour
  • 300ml chicken stock or vegetable stock
  • 150ml double cream
  • 300ml ale (I used Wild Beer 'Scarlet Fever')
  • 200g mature cheddar (grated)
  • 1tsp english mustard powder
  • good dash of Worcestershire sauce

FOR THE GARNISH:

  • 100g diced pancetta lardons
  • 1 jalapeño (thinly sliced, keep the seeds if you want it extra spicy)  

Method 

andy-bates-cheddar-and-ale-soup

In a saucepan, melt the butter and sweat the onion and garlic for 5 minutes until soft. Add the mustard powder and flour and cook out for 2-3 minutes. Slowly, add the stock and stir continuously with a whisk to avoid lumps, add the beer and bring to a boil. Add the cheddar cheese and stir until melted, then add the cream and cook gently on a low heat for 10 minutes until it has thickened. Add to a food processor or liquidiser/blender and blitz til smooth, return to a clean pan and keep warm until needed. 

In a frying pan, fry off the pancetta lardons until crispy (or to your liking).

Serve in a bowl with the pancetta and jalapeño sprinkled on top.

*For a vegetarian option, use vegetable stock and omit the pancetta on the garnish. 

(photos by Nathan Valentine)

andy-bates-bbc-two-food-and-drink

Slow Cooker Mini Hazelnut Cheesecake

Andy Bates

Here is another unconventional slow cooker recipe... 

This cheesecake is slowly ‘steamed’ rather than baked but still gives a dense and rich finish. I love the flavours of hazelnut and coffee and topped with a Nutella oat crumble you can’t go wrong.


My Mini Hazelnut Cheesecake 

image.jpg

Ingredients

(makes one 6" x 3" spring cake tin, serves 6)

For the base:

  • 6 milk chocolate digestives
  • 30g unsalted butter (melted)

For the filling:

  • 75g hazelnut praline paste (can be store bought but home-made is best, recipe below)
    • 75g hazelnuts
    • 75g golden caster sugar
    • pinch of salt
  • 450g cream cheese
  • 150g caster sugar
  • pinch of salt 
  • 1 shot of espresso
  • 50g sour cream
  • 1tsp vanilla paste
  • 2 eggs (beaten)

For the topping:

  • 1tbsp butter (melted)
  • 50g caster sugar
  • 40ml milk
  • pinch of sea salt
  • 75g Nutella 
  • 25g oats 

Method

image.jpg
image.jpg

To make the hazelnut praline paste, preheat your oven to 180C/gas mark 4 and place your hazelnuts on a tray. Place in the oven for 5-8 minutes until the skins start to spilt, take out and when cool enough rub the hazelnuts in your hands and the skin will easily rub off. You can also purchase blanched hazelnuts and skip the peeling process, but you will still need to toast them. 

Add the sugar to a pan and over a low heat, it will start to melt very quickly and become a caramel. When complete, remove from the heat and add your hazelnuts. Place on a tray to cool but remember to not place in the fridge. When cooled, smash up the praline and place in the food processor to blitz. *This will make extra and will keep in the fridge for about a month, spread a bit on toast and thank me later ;)

Fill your slow cooker with 1/2 inch of water then place a foil rack in the centre so that the cake tin can sit above the water level. A foil base can be easily made by rolling and shaping aluminium foil into a square to about 1/2 inch thickness and the length to balance the cake tin.

In a food processor, blitz the biscuits and melted butter till combined then transfer to the bottom of the cake tin and press evenly down to make the base.

In a bowl, add the cream cheese, sugar, salt and whisk quickly to combine. Next add the eggs, sour cream, coffee, vanilla paste and whisk till combined for only about 20 seconds. Be careful not to over mix.

image.jpg

Pour onto the biscuit base and transfer to the slow cooker and cook for 1.25 & 1.5 hours. Take out, rest and chill until ready to serve. Be careful not to overcook as it can split.

For the topping, add the butter, sugar, milk and pinch of salt to a small sauce pan and stir. Bring to the boil and simmer for 1 minute and remove from the heat. Add the Nutella and stir in until smooth, then add the oats stirring until completely covered. Lay mixture and flatten out onto non-stick greaseproof paper and allow to cool and firm up, which will take about an hour. Once it has firmed, break and sprinkle over top of the cheesecake. *There will be leftovers which make ideal gluten free non bake cookies.   

andy-bates-bbc-two-food-and-drink

Slow Cooker Apple, Pear and Peanut Butter Crumble

Andy Bates

For my first adventure as the roving reporter for BBC's new series of Food and Drink... I was sent to meet Miss South, a slow cooker expert. Many of us have slow cookers but they do tend to spend a lot of time kept away in the cupboard. So this was the perfect opportunity to show me that there’s much more than stews and curries with a slow cooker but also ribs, bread, brownies, puddings and jams to name a few. Intrigued by a challenge and a sucker for a dessert I have come up with a sweet recipe for you to try.

This apple, pear & peanut butter crumble could not be any simpler with 10 minutes of preparation time then just leave and let your slow cooker do all the work. The crust (to my surprise) comes out great with a dense cake like texture and the fruit holds its shape does not ‘mush’ up even with 4-5 hours of cooking. As with that all crumbles, serve with cream, custard or like me both!


My Apple, Pear and Peanut Butter Crumble 

image.jpg

Ingredients

  • 2 apples (peeled & roughly chopped) 
  • 2 pears (peeled & roughly chopped)
  • 50g golden caster sugar
  • 1tsp vanilla paste
  • 50ml apple juice
  • 1/2tsp cinnamon

For the crumble topping:

  • 50g peanut butter
  • 75g butter
  • 150g oats
  • 150g plain flour
  • 200g caster sugar 

Method

image.jpg

Place the apples, pears and apple juice directly into the slow cooker. Add the vanilla paste, cinnamon and golden caster sugar and stir until well mixed. 

Now for the crumble topping, in a saucepan gently melt the butter and peanut butter and take off the heat. Grab a large bowl and add the oats, flour and sugar mix through then slowly add the peanut butter mixture till combined. 

Scatter the crumble topping over the fruit in the slow cooker and gently pat down. 

Cover and cook for approximately 5 hours. 

Serve warm with cream or ice cream. 

andy-bates-bbc-two-food-and-drink

Halibut with Saffron Beurre Blanc and Samphire, Mussels and Langoustines

Andy Bates

This epic sharing platter is perfect for any dinner party where you wish to make a dish the centrepiece. And halibut is definitely one of my favourites, a meaty fish with mild, sweet tasting white flesh with a firm but tender texture. Because of its leanness halibut can become dried-out if overcooked and the key to not overcooking is all about the timing. Hence, slightly under cooking the halibut and leaving to rest for 10 minutes will yield a perfectly cooked piece of fish. 

Place on the middle of the table for everyone to tuck in and serve with saffron beurre blanc. 

Substitute with haddock, cod, hake or king prawns for a budget alternative. 


My Halibut with Saffron Beurre Blanc and Samphire, Mussels and Langoustines

andy-halibut

Ingredients

  • 1.5kg halibut
  • 500g samphire
  • Olive oil
  • 1kg mussels, de-bearded and cleaned
  • 12 langoustines, cooked
  • 3 lemons cut into halves and grilled
  • 150ml white wine
  • 1 tbsp white wine vinegar
  • 2 shallots
  • 1 tsp peppercorns
  • 1 bay leaf
  • 1 spring of thyme
  • 100ml double cream
  • Pinch of saffron
  • 250g cold unsalted butter, cut into cubes
  • Salt and pepper

Method

Pre-heat the oven to 180°C. Lay the samphire on a baking tray and lay fish on top, brush with olive oil, season with salt and pepper, wrap with foil, and roast for 18-20 minutes. Allow to rest for an additional 10 minutes.

In a pan, sweat the onions in a knob of butter, add the white wine, herbs and peppercorns, reduce by half, then add the mussels and cook till open. Reserve cooked mussels in a bowl, strain cooking liquid into a saucepan and discard onion mix.

For the saffron beurre blanc, add saffron and cream to the strained cooking liquid. Bring to a boil and reduce for 2 minutes, remove from heat and whisk in butter cube by cube until smooth and emulsified.

Find my full episode of '12 Chefs of Christmas' HERE

Broad Bean & Almond Hummus and Smoked Aubergine Dip

Andy Bates

A great alternative to the usual deep fried canapés or starters at a party and can be made in advance giving you more time to spend with friends and family this festive season. 

These dips will work just as well served with grilled meats at a summer bbq, particularly with lamb.

Also, try the almond butter from the butter bean and almond hummus as great alternative to peanut butter.


My Broad Bean & Almond Hummus and Smoked Aubergine Dip

andy-dips

Ingredients

For the broad bean and almond hummus:

  • 400g broad beans, peeled
  • 2 tablespoons almond butter (see method below)
  • 1 clove garlic, puréed
  • Juice of half a lemon
  • 1 tablespoon fresh chopped mint
  • 60-75ml olive oil
  • Salt and white pepper

For the aubergine dip:

  • 2 medium aubergines
  • 60ml tahini
  • 60ml lemon juice
  • 2-3 garlic cloves, finely minced
  • ¼ teaspoon ground cumin
  • ½ teaspoon salt
  • 2 tablespoons chopped fresh parsley leaves
  • 1 tablespoon olive oil, optional
  • 100g crème fraiche

Method

For the almond butter, in an oven at 180°C, roast 300g of whole almonds for 10 minutes, allow to cool then in a food processor blitz for around 10 minutes, stopping occasionally to scrap the sides, until a creamy consistency. Scoop into a container reserving around 2 tbsp in the processor. The butter can be kept in an airtight container for up to three weeks.

For the broad bean & almond hummus, add all the remaining ingredients with the reserved 2 tbsp of almond butter and blitz till smooth. More olive oil can be added if too thick. Season to taste.

For the aubergine dip, char the aubergines over a flame on the hob, then roast the aubergines in an oven for 45-50 minutes at 170°C. Allow them to cool for about 10-15 minutes in a ziplock bag. Remove the skin and transfer the flesh into a blender. Blitz with crème fraiche, tahini, garlic, lemon juice, olive oil and cumin until smooth. Season with the salt and black pepper, then transfer to your serving dish. The dips can also be placed in the fridge, they taste just as good if not better the next day.

Serve with flatbread, pitta, crisps or can even be spread on toast. 

Find my full episode of '12 Chefs of Christmas' HERE

Avocado and Smoked Bacon Sandwich with Bacon Jam

Andy Bates

This sandwich combines two of my favourite ingredients, BACON AND AVOCADO and makes for a perfect mouthful and an indulgent morning rescue after a big night out. For the most bacon-y goodness, don't clean the pan after frying the bacon and fry the sandwich in the same pan. 

For a lighter option, toast the bread with or without butter instead. 

And for the secret ingredient...  the bacon jam is a flawless addition to this sandwich and it's uses are endless. I say you make bit extra for yourself or as a gift this festive season. It keeps refrigerated for up to five days in a sealed container or can be preserved in jars and refrigerated. Enjoy!


My Avocado and Smoked Bacon Sandwich with Bacon Jam

andy-avocado-bacon-sandwich

Ingredients

(makes 1 sandwich)

  • slices thick-cut smoked bacon
  • ½ avocado
  • 50g butter
  • slices sourdough bread

For the bacon jam:

(makes approx. 400 grams of jam)

  • 500 grams smoked bacon, cut into 2 centimetre pieces
  • 1 onion diced
  • 1 cooking apple, grated
  • 2 garlic cloves, minced
  • 50g dark brown sugar
  • 1 tablespoon chilli flakes
  • 100ml coffee
  • 75ml white wine vinegar
  • 100ml maple syrup
  • Pinch of white pepper
  • Olive oil

Method

In a heavy-based saucepan cook the bacon in some olive oil until just starting to brown and crisp, remove from the pan and reserve.

Add the onion and sweat off for 5 minutes without colour. Add the rest of the ingredients and cook on a medium heat for an hour stirring regularly.

Add a touch of water if becoming too sticky. Allow to cool for 30 minutes then pulse in a food processor to a jam like texture.

For the toastie, grill the bacon to your liking, butter the bread on both sides of each slice.

Slice the avocado, layer one side of bread with the bacon then avocado, spread the jam on the remaining slice and bring together. In a frying pan on a medium heat, cook the sandwich on each side till golden brown.

Find my full episode of '12 Chefs of Christmas' HERE

Leicester Market | Nov. 16th

Andy Bates

6th Annual Winter Food Festival @ Leicester Market 

November 16, 2014The 6th Annual Winter Food Festival is right around the corner and the day is shaping up to be an excellent one!

WILL BE RETURNING TO DEMO A COUPLE OF HOLIDAY THEMED MEALS AFTER APPEARING AT THIS YEAR'S SUMMER FESTIVAL INCLUDING: LEFTOVER TURKEY AND SWEETCORN CHOWDER WITH STOVE TOP SCONES AND ONION, FENNEL AND CHEESE TATIN. IN ADDITION TO THE COOKING DEMO’S I WILL ALSO BE SERVING UP TASTY CUBAN SANDWICHES AT MY OWN STALL IN FRONT OF THE FOOD HALL.

FREE TO ATTEND AND WILL START AT 11AM TIL 5:30 PM. 

More Info -->

GET INVOLVED AND SHARE WITH FRIENDS > FB EVENT 

Milk Chocolate Tart

Andy Bates

Everyone raves about dark chocolate and how the high cocoa content makes it the most superior of all chocolates, but I love the smoothness and sweetness of milk chocolate. Gimme CANDY any day! And there are lots of people who will agree, as this is one of the cornerstones of my business. Use a high-sided tin for an extra deep milk chocolate filling and for the finishing touches, dust with cocoa powder and serve with thick cream.

This rich and indulgent chocolate dessert is sure to become a firm dinner-party favourite.

andy-milk-chocolate-tart

A FEW PASTRY TIPS...

  • Clean, cold hands give best results when working with pastry.
  • Careful not to over mix when making the dough.
  • When rolling the pastry... roll on a cold, dry surface.
  • When blind baking, push the 'baking beans' into the corners as mush as possible to retain the shape of the tin.
  • Do not be beaten by pastry... YOU ARE THE BOSS!

MY MILK CHOCOLATE TART

andy-milk-chocolate-tart

Ingredients

(serves 8 - 10)

FOR THE SWEET CRUST PASTRY:

  • 225g plain flour, plus extra for dusting
  • 75g icing sugar
  • Pinch of salt
  • 150g butter
  • 1 free-range egg (beaten)
  • egg yolk for brushing

FOR THE FILLING:

  • 600g of milk chocolate (over 35% cocoa)
  • 450ml single cream
  • 150ml whole milk
  • 3 free-range eggs
andy-rolling-pastry

Method

andy-rolling-pastry
andy-rolling-pastry

FOR THE SWEET CRUST PASTRY:

In a food processor, mix together the flour, sugar and salt, then add the butter and mix until the mixture resembles bread crumbs. Be careful not to over mix. Next add the beaten egg and pulse until the pastry forms a ball (Unlike short crust, the pastry will be more paste-like and a little sticky). Wrap the dough in clean-film and chill for at least an hour and allow to firm up.

andy-rolling-pastry

*Note: If you're making by hand, sift all the dry ingredients into a bowl and gently rub in the butter between your fingers until you have a bread crumb like consistency, mix in the beaten egg until the dough comes together. Wrap the dough in clean-film as per recipe.

Preheat the oven at 180°C/Gas 4.

andy-rolling-pastry

Roll out the pastry on a lightly floured surface to 2mm thickness. Use pastry to line a 28cm/4cm tart ring placed on a baking sheet. Rest the lined tart ring in the fridge for 20 mins.

andy-rolling-pastry
andy-rolling-pastry

Line the rolled tart ring with greaseproof paper and fill with baking beans to keep the dough from losing its shape and rising when cooking. Bake blind for about 20 minutes. Remove the greaseproof paper and baking beans and return to the oven for 5 to 8 mins or until the sweet crust pasty is starting to turn golden. Take out of oven, brush all over with egg yolk and return to the oven for 1 minute to 'dry' out (The egg yolk when dried will act as a barrier preventing the filling from escaping through any holes or cracks in the crust).

andy-pie-pastry

Turn the oven down to 130°C/Gas 1.

FOR THE FILLING:

Into a bowl break the chocolate into bite size pieces, bring the cream and milk to a boil and pour over the chocolate and stir until chocolate and cream are mixed. Allow to cool for 5 mins. Beat the eggs then add to the chocolate and mix well. Skim with a ladle if lots of froth/bubbles.

Fill the pastry with the chocolate filling. Carefully place in the middle of the oven and bake for 25 to 35 minutes or until the filling appears set but with a slight wobble. Do not allow filling to boil and rise.

Allow to cool to room temperature before serving. Dust with cocoa powder and serve with thick cream.

andy-milk-chocolate-tart


Alternatively... Why not try white chocolate instead of milk chocolate and cover with raspberries once cooked and rested.

Candied Bacon Cinnamon Rolls

Andy Bates

candied-bacon
candied-bacon

I first came up with this recipe as a starter for my Rescue Brunch pop-ups. Although a strange sounding fusion to us here in Blighty, over the pond in the States it's a well-known indulgent brunch treat. My twist is making the bacon 'candied' by cooking it with brown sugar, cayenne and chilli, taking the idea from the famous "Millionaires' Bacon" which originated in San Francisco. These flavours add an extra sweetness and spice that works perfectly with the smoked bacon and cinnamon in the bun.

Topped it all off with an icing glaze made of Bourbon, icing sugar and the sticky sweet bacon cooking juices. This is the perfect treat for a weekend brunch with friends and family. 

candied-bacon-cinnamon-rolls

But even better, these rolls can be cooked and stored for up to 3 days in the fridge and reheated through a warm oven then glazed. Or the dough may be frozen after being rolled and portioned but before second proof for later use.


Photos by @TheGaztronome


My Candied Bacon Cinnamon Rolls 

candied-bacon-cinnamon-rolls

Ingredients

(Makes 16 rolls) 

  • 250ml whole milk
  • 50g unsalted butter
  • 500g strong white flour
  • 30g caster sugar
  • 1 tsp salt
  • 7 grams sachet fast acting yeast
  • 1 large egg, beaten
  • vegetable oil for greasing 
  • additional melted butter for brushing over the buns

For the candied bacon:

  • 16 slices of streaky smoked bacon
  • 125g brown sugar 
  • 1/2 tsp cayenne pepper
  • 1 tsp dried chilli flakes 

For the paste:

  • 150g brown sugar
  • 3 tbsp ground cinnamon
  • 60g soft unsalted butter 

For the icing:

  • 100g icing sugar
  • 50-100ml of Bourbon
  • leftover cooking juices (fat) from the candied bacon 

Method

Lay the bacon on a baking tray, sprinkle with chilli flakes, cayenne and brown sugar. Grill on both sides till cooked but not crispy (must be able to be rolled into the dough). Pour the candied bacon cooking juices into a bowl and reserve until later. 

Put the milk in a pan and add the butter, melt over a lot heat and allow to stand until lukewarm. 

In a large bowl, add the dry ingredients, flour, sugar, yeast and salt. 

Pour the milk and butter mixture into your dry ingredients then add one large egg and mix into a soft dough. Knead on a lightly floured surface until smooth and elastic, about 8 - 10 minutes. 

Place in a lightly oiled bowl covered in a tea towel for one hour or until doubled in size. Leave to prove in a warm place. 

Place the dough on a lightly floured surface and roll out until it measures approximately 40x50 cm. Mix the sugar, butter and cinnamon to make the paste and spread over the dough, then lay the bacon slices away from you covering the dough (one slice of bacon per roll).

Grease a high baking tray line with greaseproof paper. 

Starting from the long edge, role into a tight log. Trim the ends and then cut in 16 equal portions giving one slice of candied bacon per roll and place on to the greased baking tray swirl side up.  

Again, cover with a tea towel or cling film and leave to rise/prove for 45 minutes.

Preheat the oven to 180C / 160F / Gas Mark 4. Brush the the top of the buns with milk and pop into the oven for 30-35 minutes or until golden.

While your rolls are baking, grab the bowl with the remaining bacon cooking juices and whisk in the Bourbon and icing sugar to a smooth icing. Pour over the warm rolls before serving.


Pineapple Cake with Passion Fruit & Caipirinha Drizzle

Andy Bates

During a visit to a local street market in Rio I find a stall set up next to a local jazz band selling Caipirinhas, lots of them! The owner of this stall/bar is Luizinho and he's a local legend. He set up his stall in the mid 1990's when he was placed in charge of serving cocktails during a political campaign. This triggered invites to other events which eventually led to his own business. Nowadays he is at his happiest talking to his customers, listening to music and of course making cocktails.

His caipirinhas are made in the traditional way with lime, sugar and Cachaca (Brazilian rum) but also with tropical fresh fruit and berries which make them very drinkable indeed. Luizinho then gets me behind his bar to give me a lesson in caipirinha making. As I look around I begin to understand exactly why he has chose this as his profession, the sun is shining, people are smiling, chatting and dancing. And of course the cocktails are flowing, it's a street celebration!

And what better way to celebrate than with cake... I've based the flavours in this cake around the caipirinha cocktail and my favourite combination that I tasted that day which was Cachaca, pineapple and passion fruit. 

ENJOY!


My Pineapple Cake with Passion Fruit & Caipirinha Drizzle

pineapple-cake

Ingredients

  • 1 medium pineapple, peeled, cored and sliced
  • 175g caster sugar
  • 125g plain flour
  • 2 teaspoons baking powder
  • ½ teaspoon salt
  • 50g desiccated coconut
  • 1 large egg
  • 2 egg yolks
  • 175g unsalted butter, melted, plus extra for greasing
  • 250ml whole milk
  • 1 teaspoon vanilla extract

For the drizzle:

  • 2 passion fruit
  • 50g icing sugar
  • 50ml cachaca
  • Juice of 1 lime

Method

Preheat the oven to 160 degrees Celsius or 325 degrees Fahrenheit and grease and line a 23cm springform cake tin with baking parchment.

Place the pineapple slices and 50 grams of the sugar into a large non-stick frying pan and cook gently for 4 to 5 minutes until caramelised. Set aside to cool.

Sift the flour, baking powder and salt into a large bowl and stir in the desiccated coconut and the remaining sugar. In a separate bowl, whisk together the egg yolk, eggs, melted butter, milk and vanilla until smooth.

Stir the mixture into the dry ingredients to make a smooth batter. Transfer a few spoonfuls of the batter into a separate bowl. Mix the pineapple slices with the larger amount of batter and pour into the lined tin.

Give the tin a tap to knock out any air bubbles then pour the reserved batter over the top. Bake for 40 to 45 minutes or until set with a slight wobble in the centre.

Transfer to a wire rack, leave to cool slightly then prick the surface all over with a toothpick or small skewer.

Meanwhile, cut the passion fruit in half and spoon the flesh into a small food processor. Pulse a few times to break down the pulp and loosen the seeds then pour into a bowl with the remaining ingredients.

Stir until the sugar has dissolved then spoon over the cake. Leave the cake to cool completely then cut into wedges and serve.

Salt Cod Kedgeree Cake

Andy Bates

andy-bates-kedgeree-cake
andy-bates-fish-fritters

I caught back up with my guide, Tereza who's promised me something special in Praia do Forte, Salvador, Brazil. The Souza Beach Hut is one of the most traditional spots on the beach. Set up in 1996, it's runs by Antonio Maurillo, and his famous snacks, Bolinho de Peixe or fish fritters are the talk about town. These are not your typical fritter, he uses a really authentic recipe of indigenous ingredients and all that I am allowed to know is that inside them there was shredded fish, coconut milk, green peppers and coriander.

For the recipe below I'll be keeping the fritter idea going but sticking with flavours more close to home.


Ingredients

For the risotto cake:

  • 100g salt cod
  • 500ml hot chicken stock
  • Olive oil
  • 25g unsalted butter
  • 1 onion, finely chopped
  • 1 teaspoon curry powder
  • ½ teaspoon ground turmeric
  • ½ teaspoon ground cumin
  • 150g Arborio rice
  • Small bunch coriander, chopped
  • Zest of 1 lemon
  • Sea salt and black pepper
  • 150g plain flour
  • 3 eggs, beaten
  • 150g dry white breadcrumbs
  • Vegetable oil for deep frying

For the pea purée:

  • 250g frozen peas
  • 50g mashed potato (for substance to the pea purée)
  • Knob of unsalted butter
  • 50ml double cream
  • Small bunch mint leaves
  • 4 medium eggs, to serve
  • Dash white wine vinegar, to serve


Method

Rinse the salt cod under running water for 10 minutes then place in a container and cover with cold water. Leave to soak overnight, changing the water 2 to 3 times throughout the soaking.

The next day, drain the cod, place it in a saucepan and cover with cold water. Bring to the boil then remove from the heat and drain thoroughly. When cool enough to handle, flake the cod into small pieces and set aside. Heat the olive oil and butter in a wide, heavy based saucepan until the butter is foaming. Add the onion along with a pinch of salt some black pepper and cook gently for 5 minutes until softened. Add the rice to the pan and fry for 5 minutes until the rice starts to turn translucent and smells slightly nutty. Add the spices and fry for a further minute until fragrant. Add a ladleful of the stock to the rice and keep stirring until the liquid is almost absorbed. Continue adding the stock in this way, stirring constantly until all of the stock has all been incorporated, this will take around 20 to 25 minutes. The rice should be soft but still have a little bite in the centre. Stir through the flaked cod, chopped coriander and lemon zest and season to taste.

Leave to cool completely then divide into four balls, flatten into cakes and lay on a plate lined with greaseproof paper. Refrigerate for 20 minutes until firm. Toss each risotto cake in flour, then in beaten egg, then in breadcrumbs. Repeat with a further coating of beaten egg and breadcrumbs. Heat the oil for deep frying to 160 degrees Celsius to 325 degrees Fahrenheit. Add the risotto cakes and fry for 6 to 8 minutes until golden brown (you may have to do this in batches). Drain thoroughly on kitchen paper and season with sea salt.

Meanwhile make the pea purée. Put the peas into a liquidiser and pour in just enough boiling water to cover. Blitz until smooth, add the remaining ingredients and blitz again. Season to taste then transfer to a pan to keep warm.

Bring a saucepan of water to a gentle simmer and add the vinegar. Crack the eggs into the pan and poach gently for 4 to 5 minutes or until cooked to your liking. Remove from the pan and drain thoroughly.

Serve the risotto cakes on a bed of pea purée and top each with a poached egg.

andy-bates-food-networkuk

My Coxinhas

Andy Bates

I reconnected with Daniela Narciso in São Paulo and she really wanted me to try one of Brazil's most famous snacks... COXINHAS! 

Daniela takes me to a new and upcoming monthly 'Street Food Festival' and introduces me to Pricilla Moretto who owns a restaurant downtown called Tangerine but comes along monthly to promote her business, build relationships with other traders and make her beloved Coxinhas.

Traditionally made with chicken breasts and cream cheese then wrapped in a flour and a chicken stock pastry, breadcrumbed and then deep fried. These snacks can be found mainly in bars served quite wonderfully next to a cold beer. Fresh, they are one of the finest bar snacks ever created, old and chilled they can be bland and disappointing.

Sao Paulo's Street Food Festival

Sao Paulo's Street Food Festival

Pricilla's on the other hand are anything but disappointing, she has made them since she was a child and believes her recipe is worthy of any dish even though she is now a restaurant chef and owner. She can sell up too 500 a day and her success is down to frying them fresh and serving straight away. She doesn't just stick to Chicken either, Duck & Apricot, Ox Cheeks and Truffled Mushrooms are just some of the other stuffings she produces. She's says if its tasty and fresh then it works. 

She then invited me behind the stall and teaches me how to fill and mould into the famous 'Chicken Leg' shape that they're known for. As look up, I notice her queue keeps getting bigger and bigger. Brazilians love them and now that I have been taught how to make Coxinhas, I totally have the bug and I am have made my very own version.


My Coxinhas

Ingredients

  • 6 chicken thighs

  • 2 tsp hot smoked paprika

  • 2 cloves garlic, peeled and crushed

  • Olive oil

  • Sea salt and black pepper

  • 150g cream cheese

  • 50g plain flour

  • 2 eggs, beaten

  • 100g dry white breadcrumbs

  • Vegetable oil for deep frying

For the pastry:

  • 500ml chicken stock

  • 250g plain flour, plus extra for dusting

  • 2 tbsp of unsalted butter

For the salad:

  • Half a cucumber, peeled, deseeded and finely diced

  • 1 banana shallot, peeled and finely chopped

  • 1 red chilli, deseeded and finely chopped

  • Small bunch basil, leaves shredded

  • Small bunch mint, leaves shredded

  • Juice of 1 to 2 limes

Method

Preheat the oven to 180 degrees Celsius or 350 degrees Fahrenheit. Put the chicken thighs in a bowl with the paprika, garlic, a drizzle of olive oil and some salt and pepper and toss to coat.

Tip the chicken into a roasting tin, cover with foil and roast for 45 minutes. Remove the skins and shred the meat into a bowl. Mix with the cream cheese and season to taste.

For the pastry, bring the stock and butter to the boil in a large saucepan, season and gradually whisk in the flour. Cook for 2 to 3 minutes, stirring continuously, until the mixture comes together to form a stiff dough.

Transfer to a bowl, cover with clingfilm and chill for one hour. To shape the Coxinhas, dust your hands with flour, take a golf ball-sized piece of dough and roll into a smooth ball. Use your thumb to hollow out the centre then add a tablespoonful of the chicken filling.

Press the dough closed around the filling then pinch and roll the top to make a chicken drumstick shape. Repeat with the remaining dough and filling. Toss each Coxinha in flour, then dip in egg, then coat in breadcrumbs and lay on a baking sheet lined with greaseproof paper.

Refrigerate for 30 minutes until firm. Heat the oil for deep frying to 160 degrees Celsius or 325 degrees Fahrenheit.

Fry the Coxinhas in batches for 5 to 6 minutes until golden brown then drain on kitchen paper. Season with sea salt whilst still warm.

Meanwhile, combine the salad ingredients in a bowl and season to taste. Serve the warm Coxinhas with the salad.

FN small.png

BBQ Prawns with Roast Chilli Salsa

Andy Bates

andy-bates-bbq-prawns

It's getting closer to kick off here in Salvador. There is a real party vibe from all the football fans. There is no other country that loves their football like they do here in Brazil, and I was just about to watch a live match. I hooked up with Paulo, he's a big supporter of the local street food and the local team Bahia Esporte Clube. I had some amazing street food outside the stadium, but I wanted Paulo to show me around inside the stadium. Paulo explains to me that Itaipava Arena Fonte Nova is brand new built for the 2014 World Cup and then goes on to tell me that he an extra surprise for me, the best seats in the arena! But before, we queued for grilled prawns. Have you ever seen that before, prawns at a football match? And they were amazing!

andy-bates-football-brazil
andy-bates-brazil-bbq-prawns

He was not allowed to tell me all the ingredients, but I will say this is one of the best football snacks I have ever had, and it gives me an idea to do something with prawns. 


INGREDIENTS

  • 24 raw tiger prawns, shells on
  • 3 cloves garlic, peeled and crushed
  • 1 teaspoon chilli flakes
  • 1 tablespoon olive oil
  • Sea salt and black pepper

FOR THE SALSA:

  • 4 ripe tomatoes
  • 2 red chillies
  • 4 spring onions
  • 1 clove garlic, peeled and crushed
  • 1 teaspoon chipotle paste
  • Juice of 1 to 2 limes
  • Pinch caster sugar
  • Small bunch coriander, roughly chopped
  • Lime wedges, to serve

METHOD

Toss the prawns with the garlic, chilli flakes and oil, cover with clingfilm and refrigerate for 1 to 2 hours, or overnight if possible.

Meanwhile, make the salsa. Preheat the barbeque to a high heat, lay the tomatoes, chillies and spring onions on the grill and cook for 3 to 4 minutes until charred and starting to soften.

Remove from the grill and transfer to a chopping board. Roughly chop everything together then tip into a liquidiser and add the remaining ingredients. Pulse to a rough purée then season to taste and set aside. Meanwhile remove the prawns from the fridge and bring to room temperature. Lay the prawns on the grill and cook for 1 to 2 minutes on each side until pink. Transfer to a platter and serve with the salsa and lime wedges.

Perfect Pork and Beans

Andy Bates

andy-bates-pork-beans

INGREDIENTS

  • 1 tablespoon lard
  • 500g leftover roast pork belly, cut into large chunks (around 6 centimetres by 3 centimetres)
  • 200g thick cut smoked bacon lardons
  • 1 onion, peeled and finely chopped
  • 3 cloves of garlic crushed
  • 2 tins pink kidney beans, drained
  • 500ml chicken stock
  • 100g manioc (cassava) flour
  • Knob unsalted butter
  • 5 eggs, beaten
  • Small bunch flat leaf parsley, chopped
  • Sea salt and black pepper

FOR THE GARNISH:

  • Left over crackling, broken into small pieces
  • Bunch spring onions, finely sliced
  • 1 red chilli, deseeded and finely chopped
  • Hot pepper sauce

METHOD

Heat the lard in a large, heavy-based pan. Add the pieces of pork and fry for 2 to 3 minutes on each side until caramelised. Remove from the pan with a slotted spoon and transfer to a plate. Add the lardons to the pan, fry for 2 to 3 minutes until golden then remove from the pan with a slotted spoon. Add the onions and garlic to the pan, fry for 5 minutes until soft then add the beans. Cook for 2 to 3 minutes until warmed through then add the chicken stock, pork and bacon and bring to a simmer. Cook for 15 minutes until the beans are soft then gradually shake in the flour, stirring continuously until thickened.

Remove from the heat and leave to rest for a couple of minutes. Meanwhile, heat the butter in a heavy-based pan. Add the eggs and cook gently, stirring constantly until scrambled and just starting to set. Stir the eggs through the pork mixture, add the parsley and season to taste. Top with the pork crackling, spring onions and red chilli and serve with hot pepper sauce.

Brazilian Pies

Andy Bates

andy-bates-brazilian-pies

During my time in the capital of Minas Gerais, Belo Horizonte, Brazil. 

Minas Gerais has one of the most rural countrysides in Brazil with many farms and plantations but it's the richness of it's interior thats translates into hearty and nutritious foods that locals enjoy in their homes and even better on the streets. I met up with chef Leonardo Paixao, Leonardo is a serious foodie and passionate chef. At just 7 years olds he started cooking with his grandfather and by the time he was 12 he was serving up culinary delights at family gatherings. Despite graduating from medical school, his food obsession won out and he now owns a successful restaurant, but is still very passionate about food served on the streets. He loves the rich history of the food here and how the land dictates it. Leo tells me that he is going to take me to try the best empadas, which is Brazilian for PIES and for me it doesn't get better! Plus it's the dish I am best known for (as some of you might already know ;)

andy-bates-brazil

But please don't confuse empada with an empanada. 

I met a brother and sister duo named Sheila and Humberto Abreu. They've been running their family empada stall for more than 25 years. Their stalls are the most recognised in Belo Horizonte and move to a different part of the city daily plus they also have four shops. That alone is proof that they must be doing something right. I tried three different versions of empada; chicken, cheese and prawn (which is their best seller). They were lovely, little parcels of tastiness, just perfect if you ask me! 

It was great to meet someone who makes pies with as much passion as I do and his flavours have inspired me to make my own pie with a Brazilian twist. I'm using a filling based on xim-xim, a popular Afro-Brazilian stew made of chicken and peanuts. 


My Brazilian Pies 

andy-bates-brazilian-pies

INGREDIENTS

FOR THE PASTRY:

  • 700g plain flour, plus extra for dusting
  • 2 teaspoons salt
  • 100g cold lard, cubed, plus extra for greasing
  • 150ml cold water
  • 2 eggs
  • 2 egg whites
  • 2 teaspoons white wine vinegar
  • 2 teaspoons olive oil

FOR THE FILLING:

  • 4 chicken thighs, diced
  • 3 cloves garlic, peeled and crushed
  • Juice of 1 lime
  • Olive oil
  • 2 onions, peeled and finely chopped
  • 1 bunch spring onions, finely chopped
  • 1 red chilli, deseeded and finely chopped
  • Thumb sized piece fresh ginger, peeled and grated
  • 2 teaspoons turmeric
  • cups dried shrimps, ground in a food processor
  • cup ground roast peanuts
  • 2 teaspoons tomato purée
  • 250ml hot chicken stock
  • 50g creamed coconut, grated
  • Small bunch fresh coriander, chopped


METHOD

First make the pastry dough. Rub the flour, salt and lard together with your fingertips until the mixture resembles breadcrumbs then make a well in the centre. Whisk together the water, egg, egg white and vinegar. Pour into the well and gradually mix together with a fork. Turn the dough out onto a lightly floured surface and knead gently until smooth. Wrap in clingfilm and set aside to rest at room temperature for 30 minutes.

Meanwhile make the filling. Combine the chicken thighs, garlic and lime juice in a bowl, cover in clingfilm and set aside to marinate for 15 minutes. Heat a splash of olive oil in a large, heavy-based pan and add the onions. Fry for 5 minutes until soft, then add the chicken pieces and fry for 2 to 3 minutes. Add the spring onions, chilli, ginger and turmeric and fry for a further 2 minutes until fragrant. Add the dried shrimps, peanuts and tomato purée, fry for a minute then add the chicken stock. Bring to the boil then simmer for 20 minutes until then chicken is tender. Add the creamed coconut and cook for a further 2 to 3 minutes until thickened. Remove from the heat, stir through the coriander and leave to cool.

Grease two 8 holes muffin tins with a little lard. Pinch off a small ball of pastry and press into the bottom of the tin to form a base. Repeat to make 16 bases then divide the cooled chicken mixture between them. Pinch off a piece of the remaining dough, flatten into a rough circle and press on top of the filling to form a lid. Use a round pastry cutter to trim the edges then repeat with the remaining pastry.

Whisk together the egg yolks and oil and glaze the tops of the pies. Transfer to the fridge to rest for 30 minutes before baking. Preheat the oven to 190°C. Glaze the pies with a little more of the egg yolk and oil mixture then bake for 20 to 25 minutes until golden brown. Transfer to a wire rack to cool slightly before serving.